Custom Layouts with PhotoSheet
If you have picture frames and photo albums with oddly sized
pages and you've been burning through your 4x6 photo paper trying to
get it right, I have good news for you: PhotoSheet supports custom layouts!
There have been a few other minor improvements - for instance, it's
easier to rearrange the images on a sheet; just click the image in
the preview picture and it'll be selected in the list. You can also
drag-and-drop the images in the preview to rearrange them. Or use the
Recompose feature to zoom and reposition individual images. Click
here to learn more about those capabilities.
This page will explain some of the features that enable you to customize
the layout and paper size, and create your own layouts and sheet sizes.
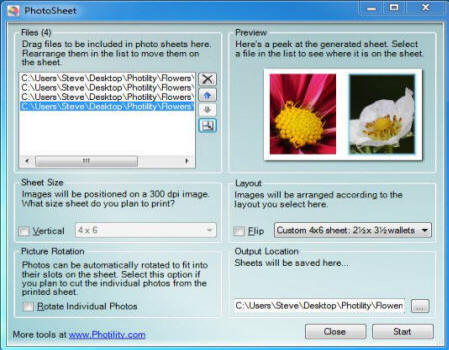
Here's a screen shot from the Windows XP version of PhotoSheet, showing one of the custom layouts (a 4x6 sheet
containing a pair of 2.5 x 3.5 pictures, perfect for those small
picture frames).
In the Sheet Size section I've added several common paper sizes
to the list. To simplify the list the "Vertical" checkbox can be
used to flip the page between horizontal and vertical orientations. If the shet size
you're looking for isn't available, scroll down to learn how to add a custom sheet size.
In the Layout section, the "Flip" checkbox can be used to flip
the layout between horizontal and vertical orientations,
independent of the paper orientation. Watch the preview area
carefully - if what you see isn't what you're looking for, you can
try changing these two checkbox settings (Vertical and Flip) to find
the layout you like.
The content of the drop-down list in the Layout section is the
most interesting new capability of PhotoSheet.
- There are numerous "grid" layouts that arrange many photos
on a sheet (any size sheet). I use these for those collage
picture frames in my house that just don't seem to have enough
4x6 openings. This way I can cram more photos into one of the
4x6 openings.
- There are several "collage" options that are similar and
more creative.
- There are also a few "wallet" options that you can use to
create wallet images on your 4x6 photo printer. These are
designed to create very specific-sized images and assume you are
printing on a 4x6 sheet. If you're printing to a 5x7 or 8x10 (or
larger) printer, you can create your own custom layouts for
those (keep reading...).
- At the bottom of the list are the customization options. You
can:
- Download new layouts from Photility, which will be added to this list (these
layouts typically begin with "Photility").
- Add new custom layouts of your own (keep reading for how
to do this).
- Refresh the list (do this after you edit the custom
layouts).
If you come up with a great layout, send it my way and I'll make it
available to everyone through the Photility collection. And since I
occasionally add more layouts to the Photility collection,
you might occasionally choose this option to get the latest set.
Adding your own custom layouts and sheet sizes
When you choose the "Edit Custom Layouts" option from the list,
the program opens Windows Explorer showing the Custom Layouts file,
as well as the Photility layouts file (if you've done the import
from photility operation from above). You can edit these files using
any text editor (NotePad is my favorite). Notes:
- Be careful editing the Photility layouts file - this file
will be replaced the next time you do the "import from Photility"
operation and your custom layouts would be lost. Use this file for ideas, and
put your custom layouts in the Custom Layouts file.
- If you mess up anything in the Custom Layouts file, you can
delete the file and PhotoSheet will re-create the default custom
layouts the next time you start the app (or use the Refresh option).
- When you're done editing and saving the custom layouts
files, return to PhotoSheet and use the Refresh option to
re-load the layout list. Your newly edited layouts should appear
in the list.
A Note about the Windows 10 and Mac Versions
On Windows 10 and the Mac, things are slightly different. Additional Photility Layouts are delivered through the App Store. And you won't find the "Edit Custom Layouts" option in the list.
On Windows 10, the ability to import custom layouts is planned for a future update.
On the Mac, you'll find the custom layouts file in the Library folder containing PhotoSheet's documents:
- Press
Command-Space to bring up the Spotlight Search window.
- paste this:
~/Library/Containers/com.photility.PhotoSheet/Data
- Look for the file named
PhotilityCustomLayouts.xml
- Edit the file using TextEdit (or another editor of your choosing).
- Quit and re-load PhotoSheet. It will look for the xml file when it starts up.
Customizing the Layouts
Adding your own custom layouts or sheet sizes is easy. The XML might be a bit
intimidating but if you're careful you can do anything. If you need
to, get some help from a friend who has built a web page; XML is
very similar to HTML.
Here's the XML for the custom 2 x 3½ sheet:
<sheetsize name="Custom 2 x 3½ or 4 x 7" width="4" height="7" />
Each PhotoSheet sheet size is described in a "<sheetsize>" element,
which has a couple of attributes that provide the name and size.
- The name attribute will appear in the list of sheet sizes in the app.
- The width and height
parameters represent sizes in inches (with apologies to metric users). For
technical reasons, these values must be whole numbers (that is, decimal values are not allowed). As illustrated,
in order to support a 2" x 3½" paper size, we double each dimension since 4" x 7"
is the same aspect ratio. (The only side effect is a larger output file since these values are multipled
by 300 dots-per-inch to determine the pixel size of the final image.)
Here's the XML for the layout shown in the screen above:
<layout size="6x4"
			name="4x6 sheet: 2.5 x 3.5 wallets (2 images)" padding="0"
			rounding="0">

			  <rectangle bottom="93.75" right="45.84" top="6.25" left="4.16">

			  <rectangle bottom="93.75" right="95.84" top="6.25" left="54.16">

			</layout>
Each PhotoSheet layout is described in a Layout element,
which begins at "<Layout" and ends with "<Layout/>". Each layout
has a couple of attributes.
- The first attribute, size, is optional. The first
number is the horizontal dimension, and the second number is the
vertical dimension. If you pick a page size that doesn't exist
in the Sheet Size list the size will be added to the list. Follow the example above and
you'll be fine. For instance, size="5x7" would describe a 5" by
7" sheet oriented vertically.
- The second attribute, name, is required. This is
the name of the layout and it is displayed in the Layout list in
the user interface.
- The third attribute, padding, is optional. If
it's omitted, it's assumed to be zero as in the example
above. Padding is a number between 0 and 100, and represents
a percentage of the allowed range of image padding. At 0,
each image will be rendered to fully fill its rectangle. At
100, the image will be scaled down inside its rectangle,
leaving empty space around it. Padding is supported starting
with version 1.0.0.13 of PhotoSheet, and is explained in
more detail here.
- The fourth attribute, rounding, is also
optional. If it's omitted, it's assumed to be zero as in the
example above. Rounding is a number between 0 and 100,
representing a percentage of the allowed range of corner
rounding. At 0 the image has a square corner, and at 100 the
image has a round corner. Rounding is supported starting
with version 1.0.0.13 of PhotoSheet, and is explained in
more detail here.
- Within each Layout element are one or more Rectangle
elements, and each rectangle corresponds to a slot on the photo
sheet into which a photo will be inserted. Each element has 4
required attributes and they can come in any order: right,
bottom, top, left. Each attribute
describes the location of an edge of the rectangle. The numbers
are percentages of the width or height of the overall sheet. So
the first rectangle in the above example would be described as
having a bottom edge that is 93.75 percent of the distance from
the top of the sheet to the bottom of the sheet. Its right edge
would be 45.84 percent of the distance from the left edge of the
sheet to the right edge of the sheet. And so on.
Since that's a somewhat advanced layout, let me show you the
layout for a simpler grid layout. This is the XML for a layout with
one row of 3 photos stretched evenly across the sheet:
<layout name="Grid 3 (1
			x 3)">

			  <rectangle left="0" top="0" right="33" bottom="100"/>

			  <rectangle left="33" top="0" right="66" bottom="100"/>

			  <rectangle left="66" top="0" right="100" bottom="100"/>

			</layout>
- You can see the "<layout>" element with its name
attribute. The size attribute is optional and is
omitted because this layout is intended for all page sizes.
- There are three "<rectangle>" elements.
- All three rectangle elements have the same value for their
top (0 percent of the distance from the top of the
sheet to the bottom), and bottom (100 percent of the
distance from the top of the sheet to the bottom). This is good;
we want them to stretch the full height of the page.
- The left and right attributes for each
rectangle show that each rectangle gets 33 percent (1/3) of the
width of the page, and the left and right edges of each
rectangle are progressively 33 percent to the right of the
previous rectangle.
Phew. Hopefully that made sense.
If you come up with any handy layouts, send them along and I'll
update the Photility layout collection for all to enjoy. Meanwhile,
I hope you enjoy the feature.