 Picture Medley
Build a photographic mosaic composite image from your photo collection.
This software starts with your trove of digital images and creates a Picture Medley by arranging the images to resemble a target image you provide. Viewed from a distance, the images appear to blend together to produce a new image that was previously hidden. From up close, you can easily see the individual images.
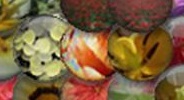
To the left you can see an example Picture Medley, using the application's icon as the target image, and a collection of flower photos as the individual tile images.
What is a "Picture Medley"?
In musical terms, a medley combines a variety of melodies to form a new composition. When you listen to a musical medley, you hear and can recognize the individual melodies; and the overall composition has its own overall theme and presence.
In photographic terms, then, a medley combines a variety of photographs to form a new composite image. Similar to a musical medley, you can see and recognize the individual images within the Picture Medley, but the overall composite image captures a bigger concept than the individual images can capture on their own.
Medley images are also referred to as photographic mosaics, or photographic montages.
How It Works
The idea has been around for a while. People have been creating mosaic images using ceramic tiles and other materials for centuries. With patience and time you can take a stack of photographs and arrange them to create the same results. Here is one technique you might use:
- Choose an image, and project it onto a large corkboard using a projector.
- Inspect the first photo in your stack of photos. You're looking mainly for high-contrast edges, and the overall color of various parts of the photo. Hold the photo up and try it in various locations on the projected image, until you find a location where it seems to disappear into the projected image. You've found a match! Attach it to the cork board.
- Repeat this for each of the rest of the photos in the stack. You will find that you can usually slide the photos around slightly to reduce overlap and hide more of the cork without detracting from the overall match.
- You're finished when you don't have any cork showing through the photos.
Overview
Highlights:
- Create your own Picture Medley in four easy steps!
- Smart defaults allow you to focus on the medley creation.
- Many customization options give you great creative flexibility.
- Easily include the Target image as a tile (checkbox in step 2).
- Override the smart defaults in the "Advanced Options" dialog.
- Disable the "use tiles only once" feature.
- Transparency is supported in Medley imagery, enabling very creative effects.
- Several visual effects including a "Frost" option where the overall medley is tinted slightly with the colors of the target image, which helps to make the target image more visible especially when you don't have enough of the right colors in the image tiles.
- Project files allow you to pick up where you left off with a previous medley effort, and also include details about the generated medley to help you find specific tiles or understand how the tiles were used.
- HTML output uses ImageMap for an interactive Medley experience!
Once you download and install Picture Medley, you will be on your way to creating your own Picture Medley in four easy steps.
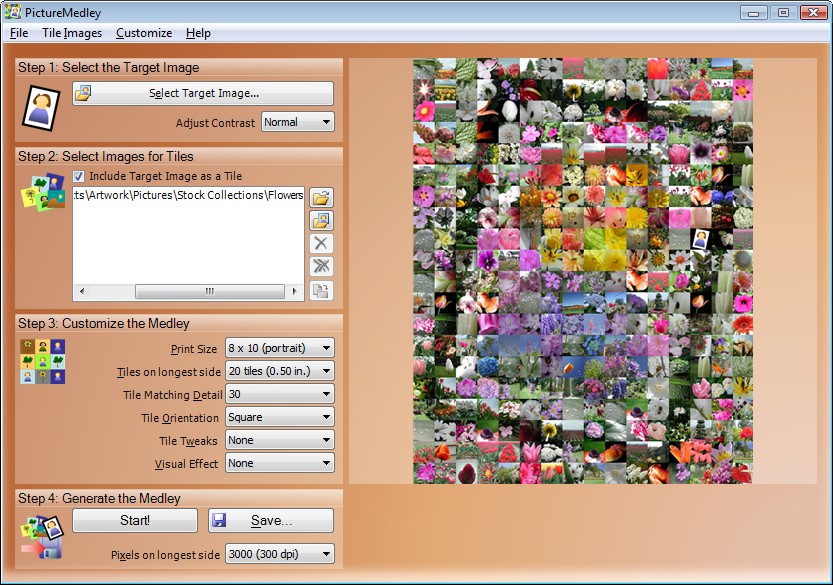
 Step 1: Select The Target Image
Clicking the large button will allow you to browse for a file on your hard drive to use as the Target Image. Alternatively, you can access this functionality from the File menu, by right-clicking the large target rectangle, or by dragging a file from Windows Explorer into the target rectangle.
Contrast: Sometimes, increasing the contrast of the target image will help to exaggerate the details in the image, helping the final medley be more recognizable.
The Page can be transparent!
PNG ("portable network graphics") format images include support for transparency. To start, use your photo editing software to make the background area of your target image transparent. Then, in Picture Medley, access the "Advanced Options" window from the "Customize" menu. Set the "Page Background Color" options to "Transparent", then you're on your way. (The software allows you to choose different options for comparison and output, allowing additional creative options for the images you create). With Transparency enabled, Picture Medley will only use tiles for tile regions that are not transparent, which further increases the fidelity of the final image. You can customize how Picture Medley handles transparency in Advanced Options.
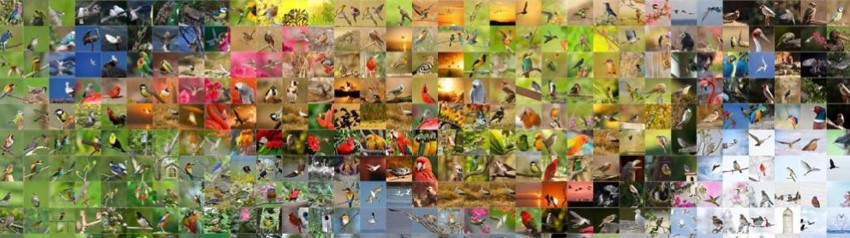
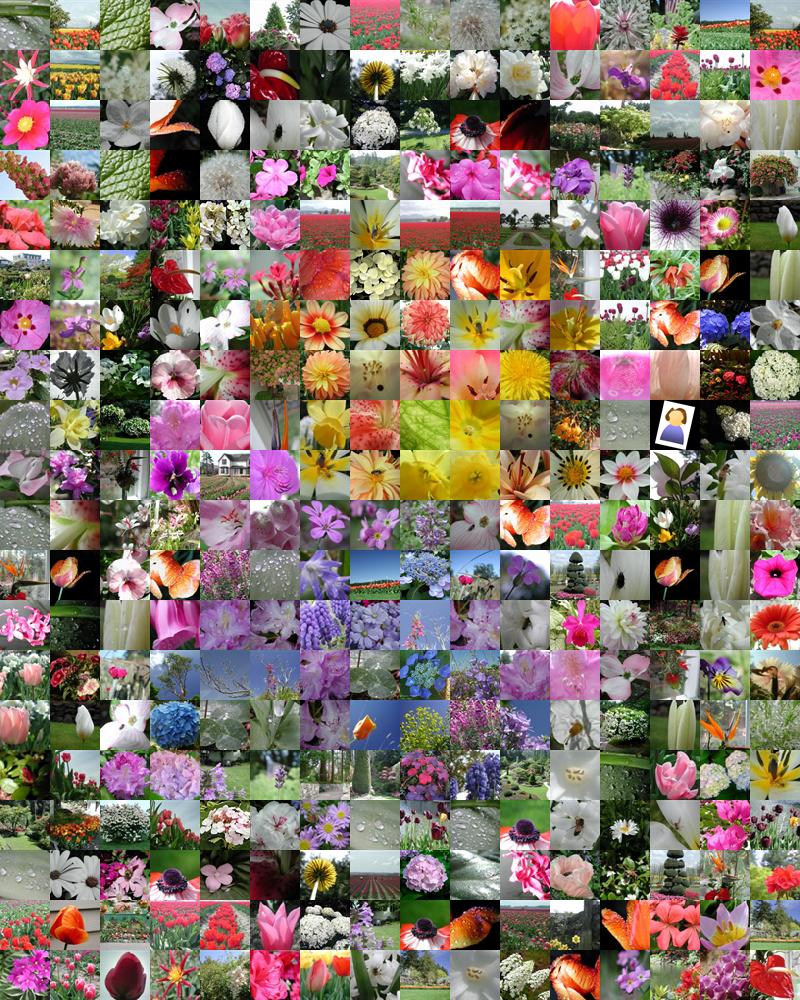
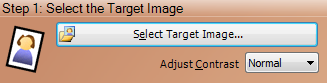
 Step 2: Select Source Images for Tiles
Every medley is made up of a bunch of images. These have to come from somewhere!
- Click the "Add Folder" button to add a folder whose contents will be used for source images.
- Click the "Add Files" button to add one or more individual files to be used for source images.
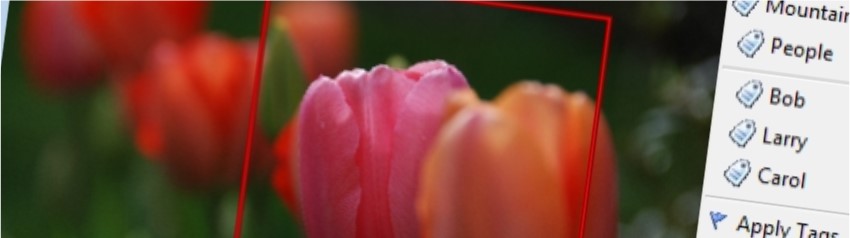
- Select items in the list (put a checkmark in the box) to "pin" them in the medley. Pinned images will be guaranteed to be included in the medley, even if they are a less-than-perfect fit. Note: Be careful to use this feature judiciously: pinning too many images will reduce the quality of the final medley.
- Select "Include Target Image as Tile" to automatically include an appropriate crop of the target image as a tile in the medley. It'll automatically be pinned. (It can be fun for the viewer to try to find the target image inside the medley.)
- Highlight items in the list and click "Remove" to take them away.
- Use the "Remove All" button to clear the list completely.
Alternatively, you can access this functionality from the Tile Images menu, by right-clicking in the list, or by dragging files and folders into the list box.
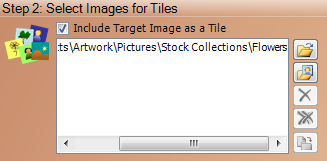
 Step 3: Customize the medley
To get started, select a Print Size from the drop-down list, which will select default settings appropriate for a print of the selected size.
Print Size
This list is populated with a variety of common print sizes, in inches. Select an entry from this list that corresponds to the size of the print that you plan to generate using the output of the program.
The "Tiles on Longest Side" option allows you to control the density of the grid used for tile layout.
From across a room, the medley should appear to be the target image. But from "up close" you should easily be able to see the individual tiles. For an 8x10 print framed and hung on a wall I've found that tiles can be about 1/3 inch and be recognizable up close but disappear into the overall composition from further away. This translates to 3 tiles per inch, or 30 tiles in 10 inches. Thus for a print size of 8x10, a setting of 30 for "Tiles on Longest Side" would be appropriate.
You should consider where you plan to display the final medley, and how close the viewer will be able to stand. Make sure the tile size is large enough to be recognizable when the viewer is at the closest viewing distance.
Each source image is compared with each grid location by overlaying a small grid on each tile and comparing areas of that grid against corresponding areas in a grid overlaid on the target. The "Tile Matching Detail" setting controls the resolution of this small grid. A higher setting results in a more accurate comparison (and thus a higher quality medley), while a lower setting requires less time to calculate each comparison.
Tile Orientation
By default, the software will select the largest possible square region from the center of each source image. You can override this and use horizontal or vertical crops from the tile images. The aspect ratio of the tiles will automatically match that of the overall print size.
Tile Tweaks
A few tricks can be used to help tiles match the target image a little more closely. Learn more about these on the Tile Tweaks page.
Visual Effects
Several visual effects are available to add variety to the medley. Samples and descriptions are available in on the Effects page.
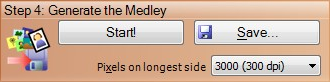 Step 4: Generate the medley
Start!
Once you've established the options for the medley, click this large button to kick off the process, then sit back and watch the medley take shape. You'll see the progress bar for a few steps:
- The software will process the target file and establish a grid of "target" tiles.
- All of the source images will be loaded from disk.
- Each source tile image will be tested in each position in the target grid. Tiles will be placed into their best initial positions in the order encountered.
- The software will experiment with different combinations of tiles at various locations in the grid to determine whether the medley looks "closer" to the target image. This process will continue for a while, especially if there are a large number of tiles or target grid positions. A 60x60 medley with 4000 source tiles can take over an hour, while a 20x20 medley with 1000 source tiles can finish in less than 5 minutes.
Save...
The application will create a high quality JPEG or PNG file at a pixel resolution of your choosing.
By default, the final size of the image will be calculated from the selection in the "Print Size" list. Since photo printing services typically print at 300dpi, the "Pixels on Longest Side" setting is calculated by multiplying the longest dimension of the print size by 300. As such, an 8x10 print size will have 3000 pixels on its longest side.
When it comes time to save the final generated image, use this option to control the final size of the output image. Typical photo printing services produce output at 300 dpi, so one way to calculate the value for this option is to multiply the desired size of the longest side of the final print by 300.
The software calculates this value by multiplying the longest dimension of "Print Size" by 300, on the assumption that 300 DPI printing is desired.
The Save button is only available after a medley has been generated. Once the medley has been generated, changing any of the settings under "Tuning the medley" will erase the medley and the Save button will be disabled.
Once you click the Save button you will be prompted for the name and location of the image to generate. The software will then proceed through the in-memory representation of the medley, create the final image, and save it to disk. Since the software is re-loading the individual tiles, this can take some time-consuming process for a large medley.
The Getting Started section above provides a great overview of the process, and here are a few more links to help you as you dig further into the software:
Medley Gallery
 PictureMedley embodies the idea that the whole can be greater than the sum of its parts. You can combine a collection of related images to assemble an overall image that represents a theme that the images share in common. Check out several examples on the Themes page.
Effect Samples
PictureMedley includes a number of effects for tiles. Some are useful to help the target image show through, others are purely for fun. Be sure to check out the Tile Effect Gallery!
Community Samples
I have been fortunate that some people have kindly shared their creations with me, which is very rewarding. You can find their samples on the Community Gallery page.
I love hearing feedback from folks running the software, even when it's to report that the program isn't running correctly. You can review some of the frequently asked questions in the F.A.Q. section.